


Ever feel frustrated with your eye exam? Confused by the slit lamp and even more distressed at the thought of doing fundoscopy? Point-of-care ultrasound (POCUS) is taking over emergency medicine and improving your eye exam is another area where it can help. Actually the eye is an ideal structure for viewing with ultrasound since it is a superficial structure and conveniently fluid filled. However, the spherical three-dimensional structure of the ocular globe can lead you astray when trying to view it using a two-dimensional ultrasound image. This POCUS post offers an introduction to scanning the eye and some tips to make sure you capture the full 3D details.
Ocular ultrasound has a range of clinical applications including painless vision loss (e.g. retinal detachment, posterior vitreous detachment), painful vision loss (e.g. globe rupture), vascular phenomena (e.g. central retinal artery occlusion), raised intracranial pressure (e.g. papilledema) and examination of the orbital bones [2]. The most common use, and they one we want to focus on, is painless vision loss in particular assessing for retinal detachment (RD) and posterior vitreous detachment (PVD).
Before diving into the details of RD and PVD lets review the standard instructions for carrying out ocular ultrasound. Most resources [1-4] offer advice that can be summed up as
- Scan the eye in the transverse plane
- Ask the patient to look up and down.
- Scan the eye in the sagittal plane.
- Ask the patient to look side to side.
This approach is not wrong but it glosses over some important details that can dramatically improve your ocular ultrasound technique. In particular we want to focus on the point that when looking for retinal pathology you want to LOOK UP / SCAN UP and LOOK DOWN / SCAN DOWN and when looking for vitreous pathology you want to use a DYNAMIC VIEW (aka. oculokinetic echography)
Let’s start with retinal pathology and see how the standard technique fails. Though we often think of the retina as a posterior structure it actually covers 65% of the interior surface of the eye. The anterior part of the retina attaches to an area called the ora serrata [Figure 1] that is often neglected when doing fundoscopy and during ocular ultrasound. Like any attachment point the ora serrata is an area where retinal detachments can originate and needs to be included in a complete ocular scan.
FIGURE 1

A common mistake when assessing for retinal detachment is having patients look directly forward and sweeping the posterior part of the eye. This technique only assesses a small portion of the retina [figure 2] and does not assess the anterior limits of the retina where it forms the ora serrata [figure 3]. To properly capture the remaining retina we need follow this rule: “SWEEP UP and LOOK UP” or conversely “SWEEP DOWN and LOOK DOWN”. When we sweep the probe upwards the orbital bones and curved surface of the eye limit how much of the retina is seen [figure 4] however at this point we can scan the reminder of the retina by having the patient move their eye upwards and thus bring the remainder of the retina into view [Figure 5]. The scan is repeated in the sagittal view where the same rule can be rephrased as “SWEEP LEFT and LOOK LEFT” and “SWEEP RIGHT and LOOK RIGHT”
Figure 2
Common mistake is to conduct a partial sweep of the retina, with the patient looking directly ahead, that only captures the retina under the arc in light blue.
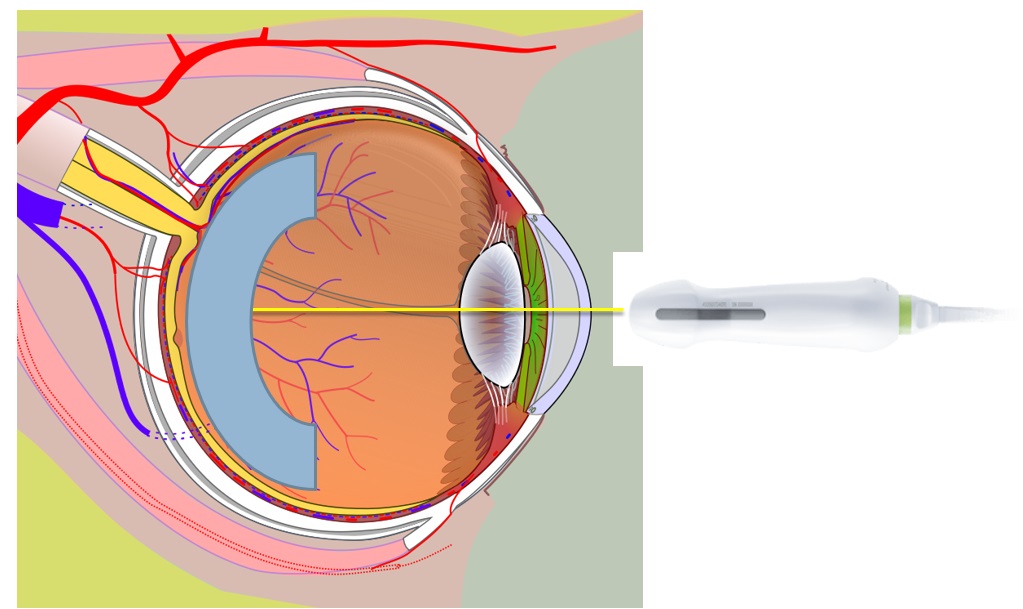
Figure 3
The extent of the retina missed by the sweep in figure 2 is represented by bright red semi-circles. The actual retina tissue is the yellow layer below that thins out and terminates at the ora serrata.
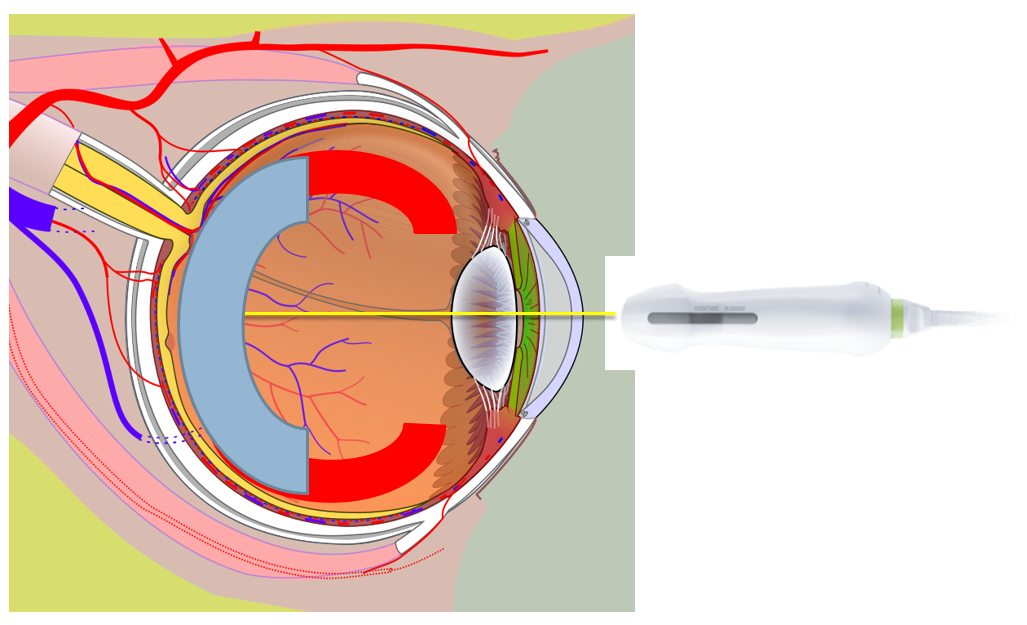
Figure 4
Common limits of the retina scan. Sweeping the probe at steeper angles is usually limited by the facial bones / soft tissue or the probe loses contact with the curved surface of the eye. Blue arc represents the portion of the retina already scanned. The red arcs represent portions of the retina that have not been scanned.

Figure 5

The patient’s gaze is directed upward and following the rule that you need to “LOOK UP and SWEEP UP” the lateral extremes of the retina (identified as red semi-circle) up to the ora serrata now come into view.
Let’s look at a recent case that emphasizes the importance of scanning the entire retina all the way to the lateral edges at the ora serrata. A clip (video 1) shows the usual approach of scanning the eye with the patient looking directly forward. Do you see a bright posterior structure indicating a retinal detachment? No? Neither did we. Scanning the same eye again with the patient looking up reveals a very different result (video 2). Now this peripheral retinal detachment is much more obvious.
Video 1: Failure to scan to the peripheral edges
Video 2: Complete scanning to the peripheral edges.
So to summarize when looking for retinal pathology adjust your technique to ensure you follow the rule
- In transverse
- Sweep UP … then patient looks UP
- Sweep DOWN … then patient looks DOWN
- Rotate to Longitudinal
- Sweep LEFT … then patient looks LEFT
- Sweep RIGHT … then patient looks RIGHT
When seeking out vitreous pathology the rules change once again. As opposed to a retinal detachment a vitreous detachment is more subtle and more mobile. To identify a PVD we take advantage of this fact by examining the vitreous using a DYNAMIC PROCESS (aka. “Oculokinetic echography”).
As before let’s use a real case to illustrate the value of static vs dynamic views of the vitreous. In the first clip (video 3) can you confidently see any echogenic material floating freely? Maybe? If you look very closely there is a faint trace of white material towards the back of the eye and on screen right but it is by no means convincing. Repeating the same scan with dynamic eye movements (video 4) yields a much more convincing diagnosis of PVD.
Video 3: No clear evidence of PVD without motion
Video 4: The PVD is much more obvious with the eye in motion.
To summarize the scanning approach for posterior vitreous detachments
- In Transverse
- Dynamically look left / right
- In Longitudinal
- Dynamically look up / down
References
1. Kilker, B. A., Holst, J. M., & Hoffmann, B. (2014). Bedside ocular ultrasound in the emergency department. European Journal of Emergency Medicine,21(4), 246-253.
2. Wiss, R., & Socransky, S. (2012). Point-of-care ultrasound for emergency physicians:“the EDE book”. The EDE Course, 17-23.
3. Shinar, Z., Chan, L., & Orlinsky, M. (2011). Use of ocular ultrasound for the evaluation of retinal detachment. The Journal of emergency medicine, 40(1), 53-57.
4. Nagdev, A. (2014, March 11). Https://www.aliem.com/2014/ocular-ultrasound-retinal-detachment-posterior-vitreous-detachment/. Retrieved October 1, 2016, from https://www.aliem.com/2014/ocular-ultrasound-retinal-detachment-posterior-vitreous-detachment/

- Seeing Clearer with Ocular Ultrasound - October 14, 2016